How to Build an Optimizely Connect Platform (OCP) App
How to Build an Optimizely Connect Platform (OCP) App
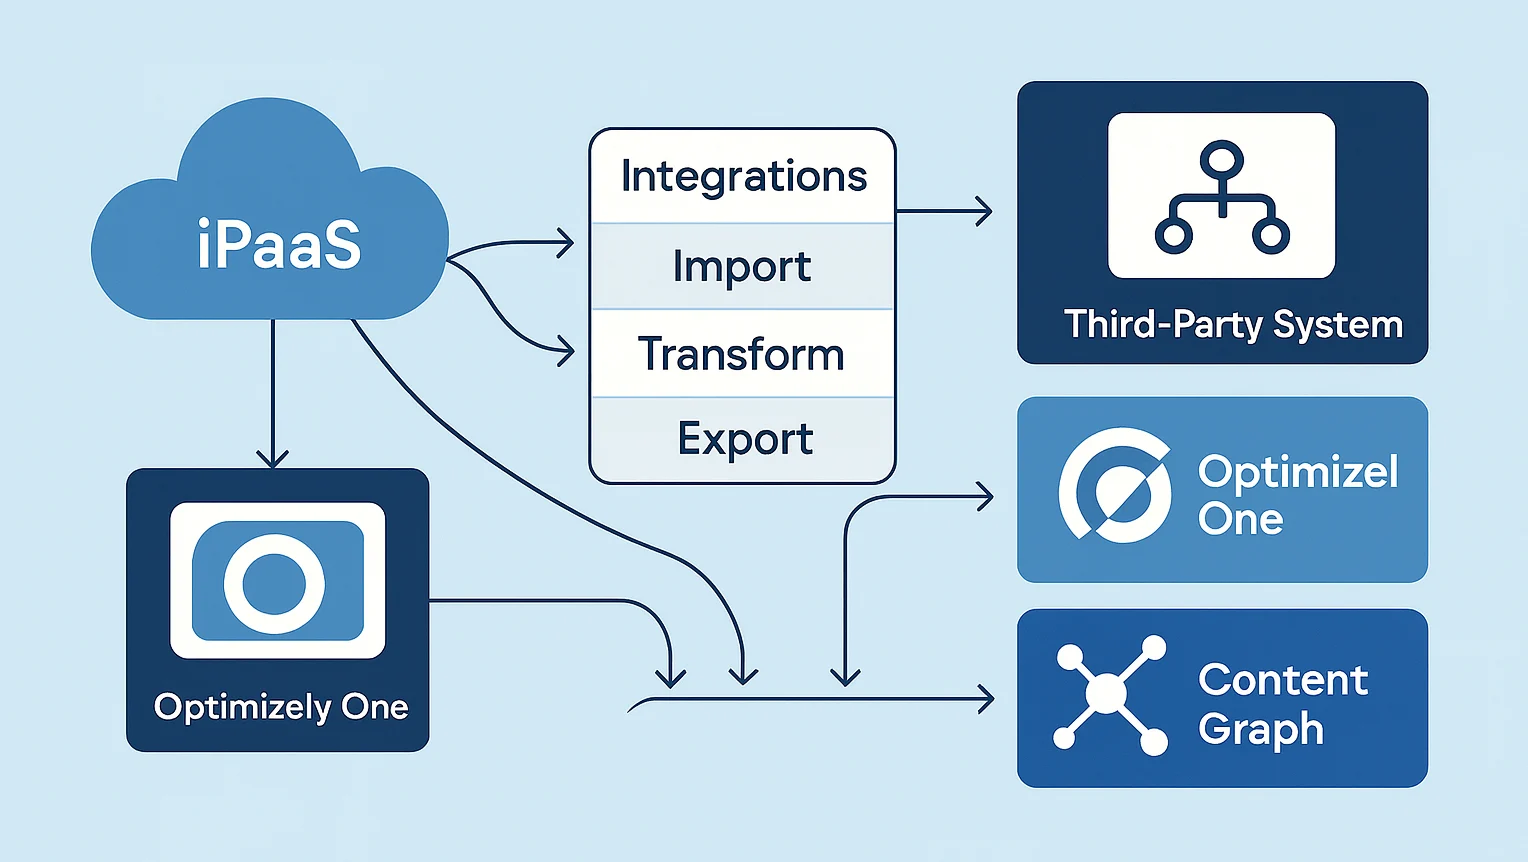
The previous article introduced the Optimizely Connect Platform (OCP) and explored how it enables systems across Optimizely One to exchange data cleanly and consistently. This post builds on that foundation by taking a more practical, developer-focused look at the platform.
In this article, we’ll walk through the process of creating an OCP app that connects to Cloudinary — from scaffolding the project and defining the data schema, through to implementing jobs, validating the app, and publishing the integration.
Getting Started
Before we start building the Cloudinary connector, there are a few prerequisites to put in place.
1. Get an OCP Developer Account
Request access from Optimizely to obtain tools and permissions. See the Optimizely documentation for more details.
2. Set Up Your Development Environment
Requirements:
Node.js 18
Yarn 1
OCP CLI
Verify your setup:
1ocp --version3. Scaffold a New App
1ocp app initThis creates:
App definition
Schema YAML
Jobs folder
Functions folder
Settings form
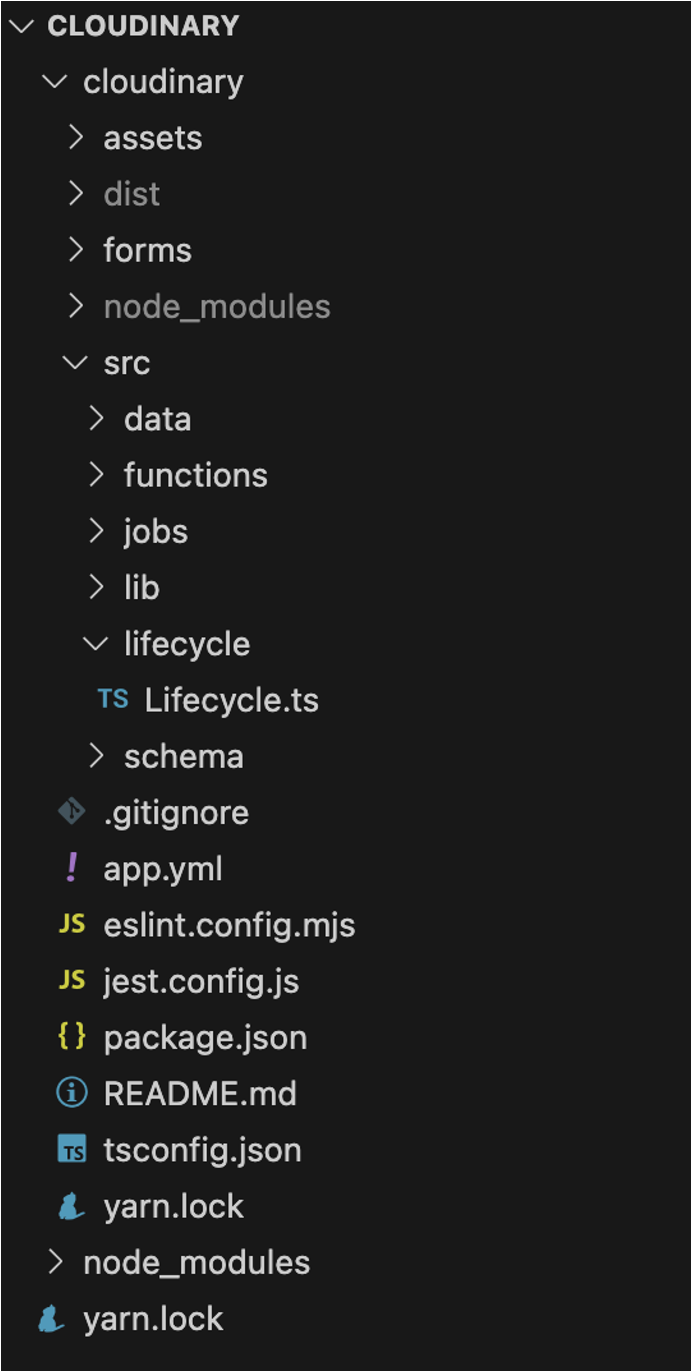
Example file structure
The scaffolded application is a great starting point and provides the foundation for the Cloudinary connector used in this example.
Building the application
Now that the application has been scaffolded, we can move on to building the Cloudinary connector.
1. Application Settings
We need to capture the credentials and the integration endpoint so the application can authenticate and communicate with Cloudinary. It is possible to extend the OCP interface to capture these and save securely for use within the application.
settings.yml
The 'settings.yml' file is used to define the form. This form captures all the settings required by your application. The form can contain sections, allowing for settings to be logically grouped.
1sections:
2  - key: authorisation
3    label: Authorisation
4    elements:
5    - type: text
6      key: url
7      label: Integration URL
8      help: The URL of the Cloudinary account to integrate with. This is typically in the format `https://api.cloudinary.com/v1_1/<cloud_name>`.
9      hint: https://api.cloudinary.com/v1_1/<cloud_name>
10      required: true
11    - type: text
12      key: username
13      label: Username
14      help: The username for the Cloudinary account.
15      required: true
16    - type: secret
17      key: password
18      label: Passwword
19      help: The password for the Cloudinary account.
20      required: true
21    - type: button
22      label: Save
23      action: save
24      style: primary
25    - type: button
26      label: Start Sync
27      action: sync
28
The form can contain different field types. Fields can include validation and also reference external data sources. For more details, refer to the Optimizely documentation: Further Reading.
Form Lifecycle
As described above the 'settings.yml' file is used to define the form, but we also need a mechanism for interacting with the values when the user enters them.
The 'Lifecycle.ts' The file contains a function 'onSettingsForm' that precisely performs this task.
1  public async onSettingsForm(
2    section: string,
3    _action: string,
4    formData: SubmittedFormData
5  ): Promise<LifecycleSettingsResult> {
6    const result = new LifecycleSettingsResult();
7    try {
8
9      if (section === 'authorisation') {
10
11        switch (_action) {
12        case 'save':
13          await storage.settings.put(section, formData);
14          await registerWebhooks(formData.url as string,
15                                 formData.username as string,
16                                 formData.password as string);
17
18          break;
19        }
20      }
21
22      return result;
23
24    } catch {
25      return result.addToast(
26        'danger',
27        'Sorry, an unexpected error occurred. Please try again in a moment.'
28      );
29    }
30  }
The code above is triggered when the 'Save' button on the form is pressed. In the code snippet
The form values are saved in the OCP storage.
A custom function 'registerWebhooks' is called. This registers the OCP webhook with Cloudinary (more on this later).
2. Data Schema
As this is a 'Data Sync App', we need to define the data objects that will store the image data that we are syncing from Cloudinary.
The data object schemas are defined as YML and need to be located in the 'schema' folder.
1name: cloudinary_image
2display_name: Cloudinary Image
3fields:
4  - name: asset_id
5    type: string
6    display_name: Asset ID
7    description: Unique identifier for the asset in Cloudinary.
8    primary: true
9
10  - name: public_id
11    type: string
12    display_name: Public ID
13    description: Public identifier for the asset, used in URLs and API calls.
14
15  - name: format
16    type: string
17    display_name: Format
18    description: Document format, e.g. jpg, png, etc.
19
20  - name: version
21    type: number
22    display_name: Version
23    description: Document version
24
25  - name: resource_type
26    type: string
27    display_name: Resource Type
28    description: Type of resource, e.g. image, video, etc.
29
30  - name: type
31    type: string
32    display_name: Type
33    description: Type of upload, e.g. upload, private, authenticated, etc.
343. Jobs
Optimizely has a concept of a 'Job'. These are designed to support long running processes, for example, handling the initial data load. Jobs can be scheduled (via cron) or run on demand.
Core Concepts
Whilst a job supports long running processes, it has to be written so that the processing is run in batches, with each batch processing a subset of the overall data. In the Cloudinary example, we will not load all the images at once; we will load them in smaller chunks.
Prepare
This method is called to configure the batch for the job to process. This is where the state for the initial load is defined, or the state from the previous run is passed onto the next batch process.
Perform
This is where the actual processing is handled. It receives the state, which is used to determine the next set of images to load.
The time taken to execute the process must be kept to within 60 seconds. The parent OCP process could terminate anything longer.
1  public async perform(
2    status: HistoricalImportJobStatus
3  ): Promise<HistoricalImportJobStatus> {
4    const state = status.state;
5    let encounteredError = false;
6    try {
7      // fetch some assets from our API
8      const response = await this.fetch(state.cursor, 500);
9
10      logger.info(`response ${response.status}, ${response.statusText} `);
11
12      if (response.ok) {
13
14        const result = (await response.json()) as HistoricalImportResult;
15        const cursor = result.next_cursor ?? '';
16
17        // Update our state so the next iteration can continue where we left off
18        state.cursor = cursor;
19        state.count += result.resources.length;
20
21        // Transform our assets and send a batch to Optimizely Hub
22        if (result.resources.length > 0) {
23          await odp.object('cloudinary_image', result.resources.map(transformAssetToPayload));
24        }
25
26        // In this example, 0 assets means we have imported all the data
27        if (result.resources.length === 0 || cursor.length === 0) {
28          // Notify the customer we completed the import and provide some information to show it was successful
29          await notifications.success(
30            'Historical Import',
31            'Completed Historical Import',
32            `Imported ${state.count} assets.`
33          );
34          status.complete = true;
35          return status;
36        }
37
38      } else {
39        logger.error(
40          'Historical import error:',
41          response.status,
42          response.body.read().toString()
43        );
44        encounteredError = true;
45      }
46    } catch (e) {
47      // Log all handled errors for future investigation. Customers will not see these logs.
48      logger.error(e);
49      encounteredError = true;
50    }
51
52    // If we encountered an error, backoff and retry up to 5 times
53    if (encounteredError) {
54      if (state.retries >= 5) {
55        // Notify the customer there was a problem with the import
56        await notifications.error(
57          'Historical Import',
58          'Failed to complete historical import',
59          'Maximum retries exceeded'
60        );
61        status.complete = true;
62      } else {
63        state.retries++;
64        await this.sleep(state.retries * 5000);
65      }
66    }
67
68    // Our state has been updated inside status so we know where to resume
69    return status;
70  }
In the code above, I am retrieving the next 500 images from Cloudinary. If there are images, I will save them in the OCP database; otherwise, I assume all images have been loaded and stop processing.
View the complete code for the job in my GitHub repo: HistoricalImport.js
4. Webhooks
Webhooks allow for data to be updated on demand rather than on a schedule. This means as soon as a new image is added to Cloudinary, the OCP database will also be updated.
OCP has 'Function' that allows us to create a webhook
Define functions
You need to register your function within the 'app.yml' file.
1
2functions:
3  handle_new_asset:
4    entry_point: HandleNewAsset
5    description: Webhook that handles new assets uploaded to Cloudinary
Implement a function
1import { logger, Function, Response } from '@zaiusinc/app-sdk';
2import { odp } from '@zaiusinc/node-sdk';
3import { transformNotificationToPayload } from '../lib/transformAssetToPayload';
4import { CloudinatyImageUploadNotification } from '../data/CloudinatyImageUploadNotification';
5
6export class HandleNewAsset extends Function {
7  /**
8   * Handle a request to the handle_incoming_object function URL
9   * this.request contains the request information
10   * @returns Response as the HTTP response
11   */
12  public async perform(): Promise<Response> {
13
14    const notifcation = this.request.bodyJSON as CloudinatyImageUploadNotification;
15
16    if (!notifcation?.asset_id) {
17      return new Response(400, 'Unable to process request, invalid notification');
18    } else {
19      try {
20
21        const payload = transformNotificationToPayload(notifcation);
22        await odp.object('cloudinary_image', payload);
23
24        // return the appropriate status/response
25        return new Response(200);
26      } catch (e: any) {
27        logger.error(e);
28        return new Response(500, `An unexpected error occurred: ${e}`);
29      }
30    }
31  }
32}
When a new image is added to Cloudinary, it will call the registered webhook (see 'Lifecyce.ts'). This then calls the function shown above, which reads the Cloudinary payload and updates the OCP database.
Deploying the application
It isn't possible to run the application locally; it can only be run within the OCP platform. This means that it is vital that you write comprehensive unit tests to validate the application functionality. The OCP CLI expects this and will run any tests found within the project. The Jest testing framework is installed when the application is scaffolded.
While this can feel restrictive at first, the combination of unit tests and CLI validation makes deployments predictable and repeatable.
To test and deploy your application, you should follow the following steps:
ocp app validate- Configuration is validated, and all unit tests are run.ocp app prepare- Application is prepared for publishing.ocp directory publish app_id@x.x.x- Publish the application to OCP.ocp directory install app_id@x.x.x TRACKER_ID- Install the application into your instance.
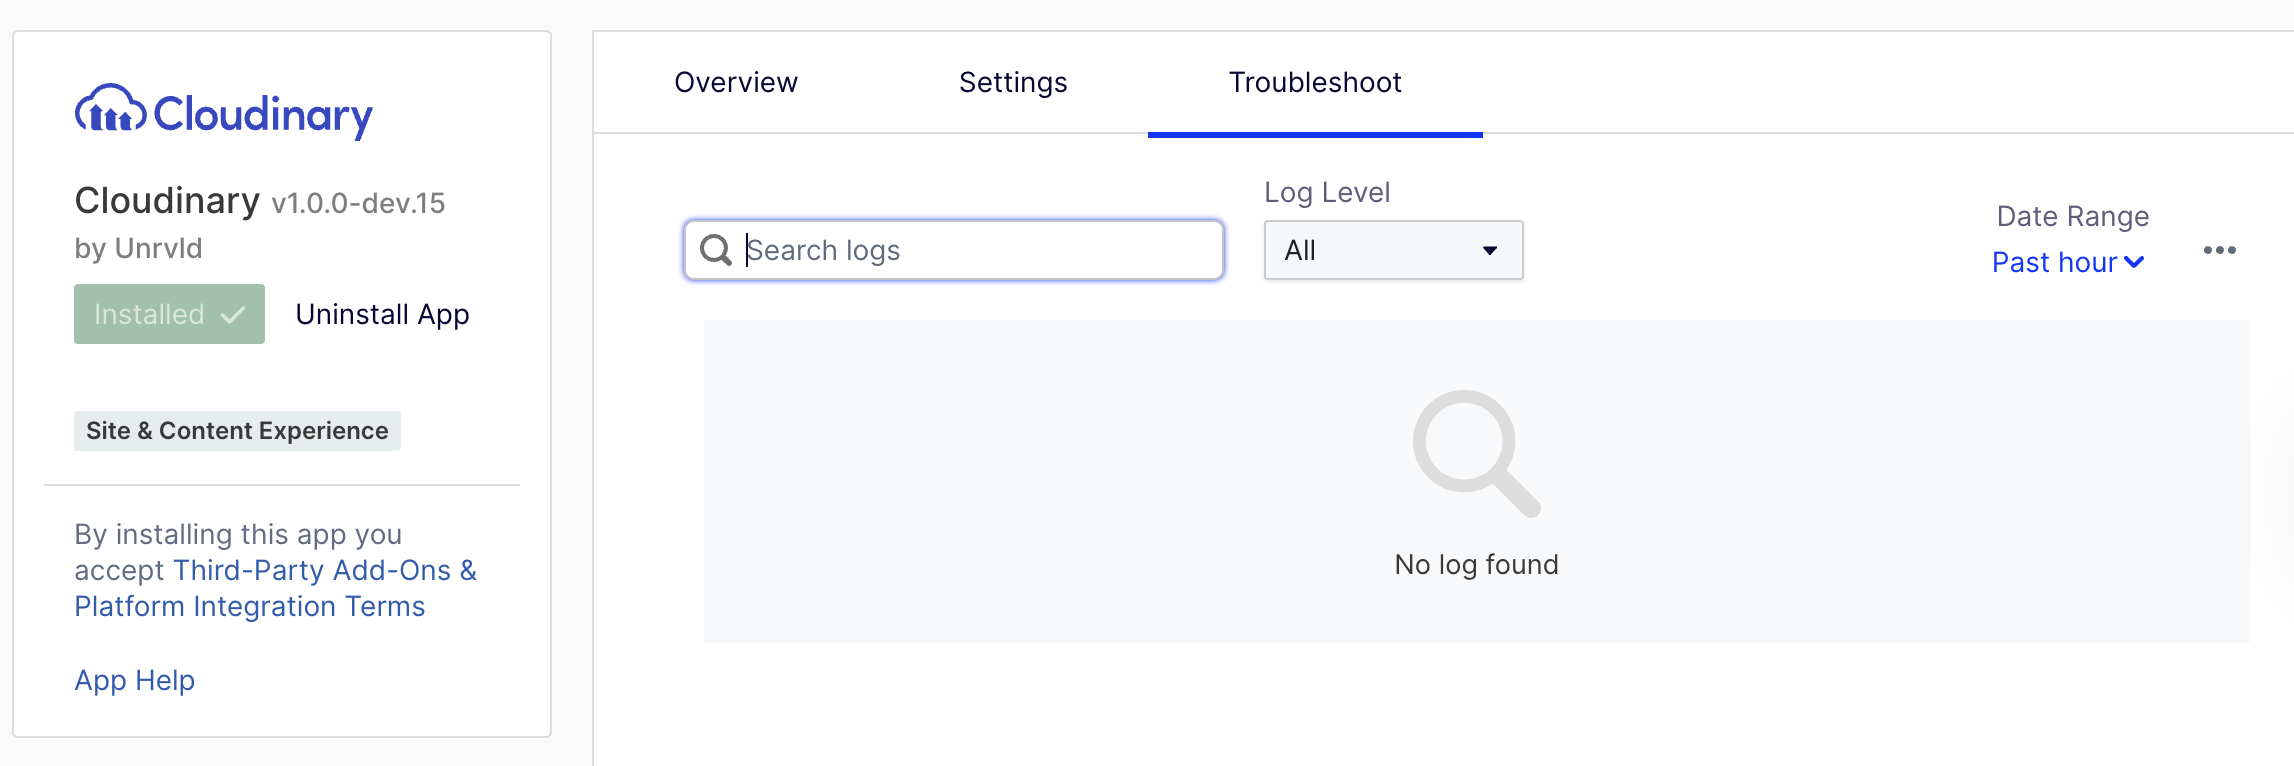
Accessing Logs
The 'troubleshoot' tab within your application will display any messages that you have written to the logs.
Closing Thoughts
The Optimizely Connect Platform delivers a robust and straightforward framework for integrating external systems into the Optimizely One ecosystem. For teams already working with Optimizely One, OCP removes much of the operational overhead traditionally associated with integration development.
I found developing the Cloudinary connector based on the scaffolded app very quick and easy.
The source code for the app is available from my GitHub repository: https://github.com/andrewmarkham/Cloudinary/